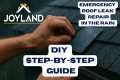
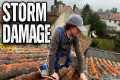
In this video we will demonstrate How-to Roof Repair bad plywood decking caused from a roof leak. We take you step by step minute per minute to make it as easy and hassle free for everyone to understand. All questions/requests are welcomed. If there is a “How-To” video you’d like to see, please comment below or message us online. We are here to make roofing simple for everyone to understand. #diyroofing
You could support our Channel by a Simple press of a button. ***Remember to Like and Subscribe*** All donations are welcomed at: https://www.paypal.me/AurumRoofing
Items/ Tools Needed- Hammer, Utility Knife with Hook Blade, Hand Held Drill, ¼’’ Hex Head Drill Bit, ¼’’ 1’’ Metal Roofing Screw with rubber gasket, plywood, claw bar, 2-½” Framing Nails, Chalk Line, Tape Measure, Claw bar, Sharpie Marker, Circular Saw, Safety First: Eye Protection and Gloves *Proper Plywood Install Images- https://photos.app.goo.gl/5UfncPtMR34QXrWh9 Step # 1- 0:20 Prepare work area by Removing Felt Underlayment. Pro Tip- Removing Metal/Plastic Caps first makes this a lot easier. Step # 2- 0:47 (X/Y) Use your Chalk Line to mark your Y studs. Pro Tip- Use the Existing Framing Nails to Help find your Y studs/rafters. Step # 3- 1:10 Use Chalk line to mark X lines (top and bottoms lines). Pro Tip- Find a square edge to use as a guide point, either the nearest plywood joint or the top or bottom roof edge. Important to make sure these marks are at an exact 90 degree angle. Step # 4- 2:25 Use your Claw Bar to remove all framing nails near your marked chalk line areas an studs. Pro Tip- This way you dont ruin your saw blade by cutting through framing nails, and plywood removal is easy! Step # 5- 3:09 Use your saw to cut your plywood (marked chalk lines) CUT ON CENTER OF STUDS. Pro- Tip- Calibrate saw for proper depth to insure you don’t cut the studs. Step # 6- 4:21 Remove Damaged Plywood decking. Pro- Tip: Once removed make sure you inspect studs for any lifted nails or wood chips make sure you have a smooth flat stud. Step # 7- 5:07 Get measurements of all 4 sides. Pro- Tip: Make new plywood cut on the floor it’s a lot easier than doing it on the roof. Step # 8- 5:39 Position new plywood cut in area. Note: Plywood should fit snug and tight around all 4 sides for a firm patch. Step # 9- 7:18 Nail Down new plywood with framing nails. Pro-Tip: Space nails 6-8” apart.
All done! I hope this was helpful. Enjoy your new roof project! #plywoodrepair
Aurum Roofing is a Full Service Residential and Commercial Roof Repair and Replacement Company. Serving Williamson, Travis and Surrounding Counties. 5 Star Rated with an Excellent Track Record for Customer Satisfaction. We specialize in installation of all roof types and materials, which include Asphalt Shingle, Tile, Metal and TPO Flat Roofing. We offer Free In-Home Consultations and Estimates backed with our 100% Customer Satisfaction Guarantee. Call us today for your Roofing Repair or Roof Replacement needs, we look forward to working with you! If you live in the Central Texas Area and would like more information about our services please feel free to call us toll free at (512)284-5239