We are members of the Amazon Associates Program and we receive commissions from products purchased after using our links. We appreciate you helping support and grow our channel.
To perform this repair you will need the following:
- Two PVC 90 degree Street Elbows - Two PVC 90 degree elbows (regular) - A piece of PVC pipe - longer than the piece being cut out - A PVC cutting tool - PVC Pipe Cement - PVC Pipe Primer - A rag
This repair is performed as follows:
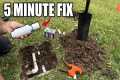
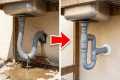
1. Cut out the section of PVC pipe that is being replaced.
2. Use the PVC primer on one of the pipes in your hole and on one of the street elbows.
3. Apply the PVC cement to both.
4. Stick the elbow on the pipe, turn it to the side and hold it for 30 seconds.
5. Apply primer to your new piece of PVC pipe and one of the regular elbows.
6. Apply PVC cement to the pipe and to the elbow and stick them together. Hold for 30 seconds.
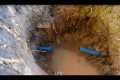
7. Dry-fit the new pipe and elbow onto the street elbow in the hole and turn it toward the other pipe being connected.
8. Apply primer to the other pipe in the hole and the other street elbow.
9. Apply PVC cement to the pipe and the street elbow and then push the elbow onto the pipe. Turn it toward the dry-fitting pipe. (Both street elbows should be facing the same direction.)
10. Cut the new piece of PVC pipe where it meets the street elbow.
11. Apply primer to the other side of your new pipe and to the other regular elbows.
12. Apply PVC cement to the new pipe and the elbow.
13. Stick them together and make sure the regular 90 elbows on each end of the new pipe are facing the same direction. (It can help to place the two elbows on a flat surface to ensure they are facing the same direction.)
14. Apply primer to both street elbows in your hole and to both of the regular elbows on your new pice of pipe.
15. Apply PVC cement to all four surfaces and then push the two regular elbows onto the two street elbows at the same time and hold it all together for at least 30 seconds.
Congratulations you just made an inline PVC repair. 😄
*BEFORE YOU TURN ON THE WATER:
Wait times before turning on the water can vary depending on the your area and the size of the pipe being repaired.
In 85 degree Fahrenheit temperature with 3/4” PVC pipe, typically 45 minutes wait time is sufficient to turn the water on.
The colder the temperature the longer the cement will take to cure.
The bigger the pipe also can take longer cure times.
If you’re unsure how long to wait you can always contact the PVC cement manufacturer and ask them directly. Most of these companies have pretty good phone support.
If you made it this far down then I want to tell you we really appreciate you watching our video. We don’t plan on going anywhere so don’t forget to subscribe so you always know where to go when you need plumbing help. 😄